Record from your computer screen and insert the recording into PowerPoint
- Open the slide where you want to place the screen recording.
- On the Inser tab of the ribbon, select Screen Recording.

- Click Select Area in the Control Dock (Windows logo key + Shift + A) or press the Windows logo key + Shift + F if you want to select the entire screen for recording.
 (The Windows logo key + Shift + F keyboard shortcut is only available if you have a Click-to-Run installation of Office 2016; MSI-based installations do not. Additionally, the minimum required version of Office for the shortcut is 16.0.7571.2072.)The smallest area you can save is 64 x 64 pixels.
 If you have selected an area, you will see the cruciform cursor. Click and drag to select the area of the screen you want to record. (If you have already made a screen recording in your current PowerPoint session, your previous selection of area will be displayed on the screen. If this selected area is available, you can continue recording, otherwise you can click Select Area to start over.)
Tip: PowerPoint automatically records audio and mouse pointer, so these options are selected by default in the Control Dock. Deselect the Audio (Windows logo key + Shift + U) and Record Pointer (Windows logo key + Shift + O) options to turn them off.
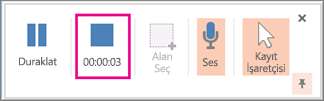
- Click Record (Windows logo key + Shift + R).Tip: Unless you pin the Control Dock to the screen, it will slide towards the top edge as you record. Move the mouse cursor to the top of the screen to make the Unpinned Control Dock appear again.
- To check your enrollment:
- Click Pause (Windows logo key + Shift + R) to temporarily stop the recording.
- Click Record (Windows logo key + Shift + R) to continue recording.
- Click Stop (Windows logo key + Shift + Q) (shown below) to end the recording.
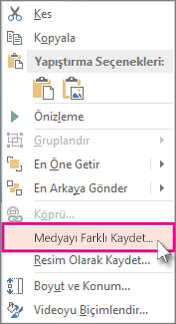
- When you’re done recording, save your presentation: File > Save. The recording is attached to the slide you selected in step 2.To save the recording as a separate file on your computer, right-click the image representing the recording on the slide and select Save Media As. In the Save Media As dialog box, specify a filename and folder location, and then click Save.
Save your screen recording as a separate file from PowerPoint
If you’re using PowerPoint 2013, make sure you’ve installed all necessary updates before trying to save your screen recording as a separate file:
- For Click-to-Run version, install 15.0.4641.1001 or later.
- For all versions except Click-to-Run, install both of these updates ( KB2883051 and KB2883052 ).
After the correct updates are installed, you can save the video file. To do this:
- Right-click the video frame and click Save Media As.
 Tip: Make sure you have enough space on your disk to save the video file. Otherwise, you’ll need to free up disk space and try again.
 - In the Save Media As box, select a folder and type a name in the File name box.
- Click Save.
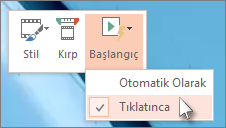
Set your video’s ‘Start’ settings
Right-click the video frame, click Start , and choose how you want your video to start in your presentation: automatically, when a slide appears, or when you click the mouse.
Trimming your video
- Right-click the video frame and click Crop.
- To specify where to trim your video part, in the Trim Video box, click Play.
- Click Pause when you reach the point you want to cut.Tip: Use the Next Frame and Previous Frame buttons to set precise timing.
- Do one or more of the following:
- Click on the starting point (indicated by the green marker in the image below) to trim the beginning of the clip. When you see the double-headed arrow, drag the arrow to the desired starting point in the video.
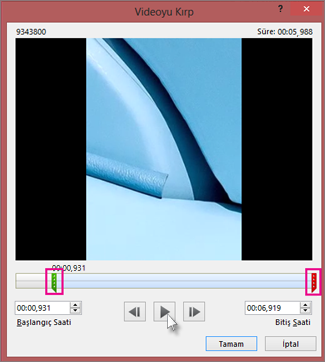
- Click on the end point (indicated by the red marker in the image above) to trim the end of the clip. When you see the double-headed arrow, drag the arrow to the desired end point in the video.
- Click on the starting point (indicated by the green marker in the image below) to trim the beginning of the clip. When you see the double-headed arrow, drag the arrow to the desired starting point in the video.
- Click OK.
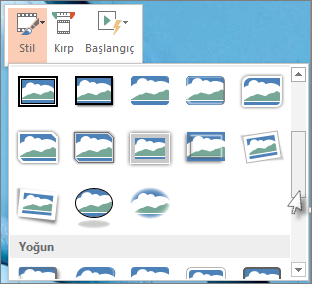
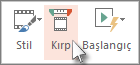
Apply a style to a video frame
Right-click the video frame, click Style and choose the style you want.